DIY No-Waste Chicken Feeder: What the Parts Really Cost
In 2012, a keeper named Darren Simmons sent a homesteading blog the parts list for his homemade chicken feeder. The total was $23.54, plus tax.
I priced the same list at Home Depot in November 2026. It comes to $110.20.
The old numbers are still out there. Grit’s PVC feeder guide, from 2012, puts the build at about $12. My Pet Chicken’s, posted in 2015 and updated in 2024, says about $13 each.
The idea behind these feeders is still sound. Karen, who writes the homestead blog The Art of Doing Stuff, says why: “There’s a misconception that chickens attract mice and rats. Chickens don’t - but their spilled feed does.”
So which build is worth a Saturday? With two kids at home, I don’t get many. I read the builders’ own pages and the comments under them, then priced every part. Here are the builds, the real prices, what went wrong for other keepers, and whether PVC is safe around feed.
How does a no-waste feeder work?
A hen at an open trough sweeps her beak sideways. Feed flies out. Then she scratches through the pile for the good bits. That’s normal hen behavior, so the feeder has to change.
A no-waste feeder keeps the feed inside a tube, a bucket, or a covered hopper. The hen eats through an opening that fits her head. She has no room to swing it, so nothing gets flung, and nothing lands on the ground for the rats.
Store-bought versions run from a $69 plastic port feeder to a $246 steel treadle feeder. (A treadle feeder has a step plate. The lid opens when a hen stands on it and closes when she steps off.) Our no-waste feeder guide compares them. This page covers the homemade kind: what people build, what goes wrong, and what the parts cost now.
Build 1: The upright PVC tube
Karen’s tube is the simplest working design I found. One morning her hens had flung the feeder empty, and a pan underneath didn’t help. Once the feed hit the coop floor, she says, the hens “wanted nothing to do with their food.”
The parts list is short: a 3-foot piece of 3-inch PVC pipe, one Y connector, and one end cap. You cut the pipe into three pieces and push them together in the Y. The short piece points up as the eating port. Nothing gets glued. “Just put it together like Lego and within minutes you’re done,” she writes.
Feed slides down by gravity. A hen has to put her head into the port to eat. It’s “big enough for them to feed from but not so big that they can whip their little heads around throwing feed everywhere,” Karen writes. Her full instructions, with the cut lengths, are on The Art of Doing Stuff.
She adds two rules. An outside feeder needs caps on the top and the port, or rain gets in and the feed goes moldy. And at night she carries hers into the coop so raccoons can’t get at it. Her later update adds a rubber mason jar seal on top of the bottom piece. It keeps feed from pooling where it gets damp.
Build 2: The PVC trough you fill from outside the run
Darren’s feeder is the other PVC design. Anna Hess called it her favorite of the designs readers had sent her, and she let Darren explain it himself:
“Before I built this auto feeder we were going through 100 lbs of food every 6 to 7 weeks. We now can go almost 14 weeks for the same amount.”
That’s one keeper’s own count. It’s still the clearest real-world number I found: the same 100 pounds lasting about twice as long.
The build is a 30-inch trough pipe with four long openings, tilted slightly downhill so feed slides down it. It sits on a 2x4 between two T-posts (metal fence posts). That puts it 9 to 10 inches off the ground, so hens can’t walk in it and scratch the feed out. A 40-inch pipe stands at one end as the feed tank. Two elbows and a cap at the top put the fill point outside the run, so Darren can refill without going in. Nothing is glued, so it comes apart for cleaning.
It took him three tries. His first plain trough still wasted feed. His second, with eight 2-inch holes, isn’t the one he kept. Rats were the other worry. His fix was a lid with a short piece of pipe screwed to its underside “to completely lock in the feed at night.” A 2.5-pound weight sits on top, and a rope opens it. He has one regret. He used 3-inch pipe because 4-inch was harder to find at his hardware store. Next time he’d use 4-inch.
Build 3: A bucket with ports
Buckets are the cheap way in. There are three versions.
Elbow ports. This is the most popular homemade one. You cut 3-inch holes near the bottom of a lidded tub with a hole saw. Then you push a 3-inch PVC elbow into each hole and seal around it with caulk. My Pet Chicken posted its version in 2015 and updated it in 2024. They say it takes about 20 minutes. They also say to keep the bottom of each elbow at least an inch above the tub floor. That gives the hens a “well” to peck from. Let the caulk dry overnight and add a second coat, so the weight of the feed can’t push the elbows out.
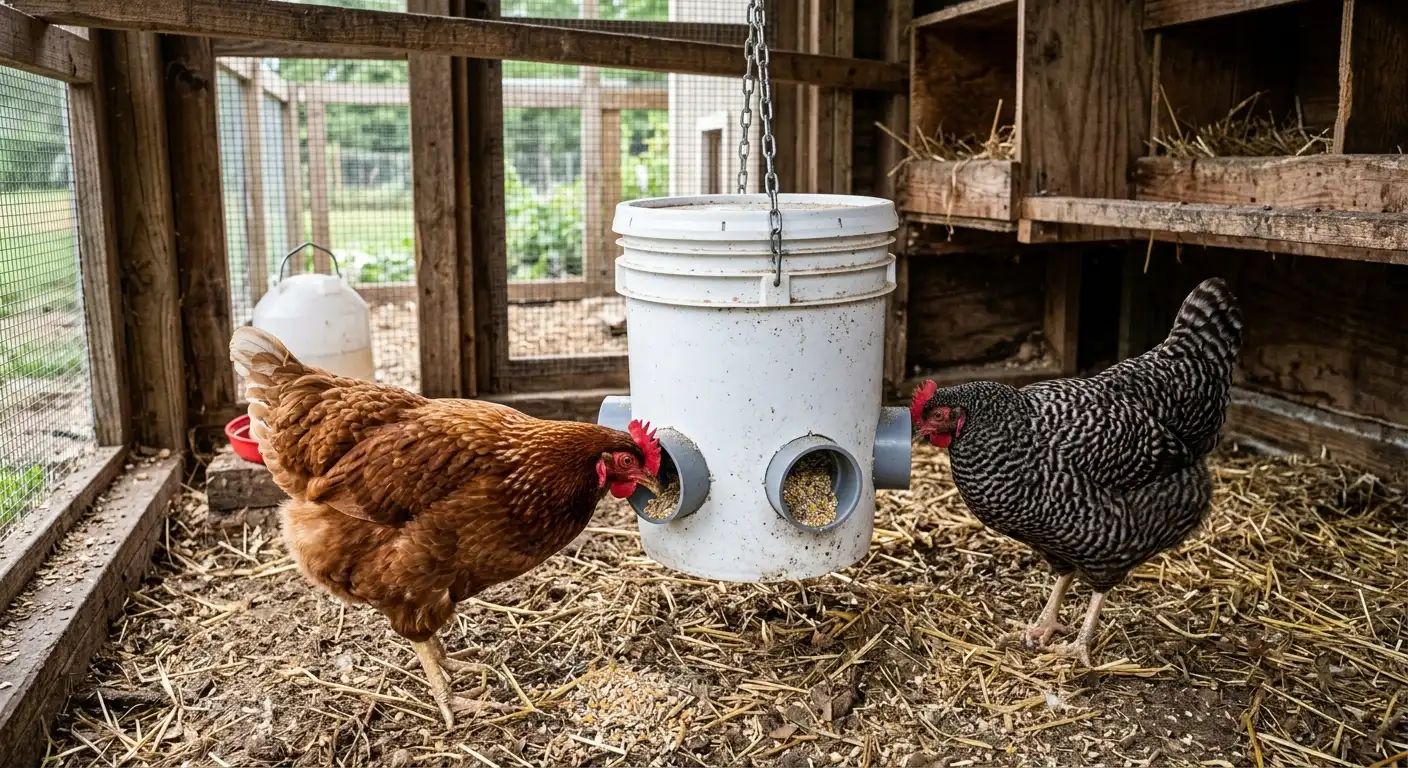
A reader’s deep dish. In Anna’s reader roundup, Karen Juarez describes a 5-gallon bucket with a lid, bolted to an aluminum pan. Notches around the bottom of the bucket let the grain flow out as the hens eat. The pan is deep enough that they can’t scratch the feed out. For chicks she uses a smaller version: a 3-pound plastic coffee container over a pan cut from a 2-gallon bucket. Another reader, Sue Tengan, hangs hers from a bungee cord. It stretches when the bucket is full and pulls it up as it empties. A chain won’t do that, so it has to be set just right. Anna says a feeder that moves a little keeps hens from perching on it and wasting feed. The feeder in the photo at the top hangs from a chain.
A kit. You can skip the cutting. A port kit turns a bucket into a covered-port feeder. The four-port kit I looked at comes with a hole saw and costs about $18. It has 4.6 stars from more than 3,100 ratings. Amazon’s review summary says it takes about 10 minutes to install. The maker calls the ports food-grade plastic.
The reviews split. Amazon’s summary counts 45 positive and 33 negative comments about waste. When the same kit gets different results, the cause is often the setup. The listing gives one clue. If the bucket hangs or sits on a stand, drill the holes as low as 1 inch from the bottom. If it sits on the ground, drill at least 3 inches up. Check current prices and listings, since kit prices move around.
Pick a bucket marked food safe. Home Depot says its orange Homer bucket isn’t. Its white 5-gallon bucket is, and it costs $5.98. A lid costs extra.
What do the parts cost in 2026?
This is each part’s price on Home Depot’s site on November 9, 2026. Prices change and differ by store, so use it to see the shape of the bill.
| Part (all 3-inch) | Price | Karen’s tube | Darren’s trough |
|---|---|---|---|
| PVC pipe, 10 ft | $56.67 | 1 | 1 |
| Y connector (wye) | $16.91 | 1 | 0 |
| Long-sweep elbow | $13.91 | 0 | 2 |
| Street elbow | $7.67 | 0 | 1 |
| Flexible rubber cap | $7.18 | 0 | 1 |
| Plain end cap | $10.86 | 1 | 1 |
| Total | $84.44 | $110.20 |
A wye is a Y-shaped fitting. A long-sweep elbow bends the pipe 90 degrees in a gentle curve. A street elbow has one plain end that plugs straight into the next fitting. The flexible cap is a rubber cap you tighten with a screwdriver. Neither total counts the 2x4, the posts, the lid, the rope or the weight.
The pipe is the problem. One 10-foot stick costs $56.67, more than half of Darren’s bill. In 2012 it cost him $8.49. The rubber cap barely moved, from $4.99 to $7.18. All told, his $23.54 list now costs $110.20, more than four times as much. He shopped at a hardware store and I priced Home Depot, so the match is rough. The jump is still huge.
The bucket routes cost far less, with one catch. A food-safe bucket is $5.98. Add the $17.99 port kit and you’re at about $24, before a lid. The elbow version is different. My Pet Chicken’s $25 build counted elbows at about $2 each. The 3-inch elbow is $8.37 now, and their plan uses four to six. That’s $33 to $50 in elbows alone, before the tub and the caulk.
Now put a store-bought feeder next to all that. Omlet’s enclosed port feeders cost $69 for 6 pounds, $89 for 12 pounds and $109 for 25 pounds, bought direct. A one-off tube costs more than the smallest. Darren’s trough costs about the same as the biggest. And that’s before your Saturday.
Building more than one helps. One 10-foot stick makes three of Karen’s tubes. Three tubes cost about $140 in parts, or about $47 each. Split a stick with a neighbor and you both come out ahead.
Feed is the other half of the math. Six hens eat about 10 to 11 pounds a week. At $18 to $25 per 50-pound bag, that’s roughly $210 to $270 a year. Cutting spillage by 15 percent gives back $30 to $40. (Our feed cost calculator runs your own numbers.) At that rate the $24 bucket pays for itself in under a year. The $84 tube takes two to three years, and the $110 trough about three. Darren’s numbers were better. If your hens waste as much feed as his did, the trough pays off in about a year.
So when does a build win? When you want its shape. Four openings give four hens room to eat at once, and the fill point can sit wherever your fence does. It loses with three hens or no free Saturday. A $69 store feeder wins both.
What goes wrong with homemade feeders?
These problems come from keepers’ own comments on the pages above.
Feed stalls in the tube. A reader named Christina built Darren’s trough. Her hens ate from it “like troopers,” but no feed seemed to drop down the vertical pipe. Anna’s guess was a pipe that’s too small, a tube that isn’t tall enough, or too little feed in it. Any of those, she said, can make feed clog instead of working around the bend. She told another reader that the weight of the extra pellets in the tall tube seems to push the feed out. So keep the tube full.
The pipe is too narrow. Three different people point at width. Darren says he’d use 4-inch pipe next time. Anna’s first guess for Christina was a pipe that’s too small. And a commenter called thebrickcoop said their rooster couldn’t eat from Karen’s tube because of his comb. I priced 3-inch parts only. Wider pipe costs more.
Hens ignore it at first. A reader named Angie said her hens ignored Karen’s tube. Karen’s answer was to add a scoop or two of feed so the tube is fuller.
Mold. Wet feed goes bad fast, and the bottom of a tube is the worst spot. After three weeks of rain, a reader in Kentucky found mold in a similar feeder with a screw-on top. Anna had no fix beyond checking often, cleaning out caked feed, and keeping rain off. The mason jar seal didn’t solve it for everyone either. In 2020, thebrickcoop wrote that feed molded in the bottom anyway and “made birds sick when we went on vacation.” I’d open the tube and check it before any trip.
Rats. In 2014, a commenter named bumpkin asked the obvious question: if a rat can chew through metal, why wouldn’t it chew through PVC? Fair question. Nebraska’s extension service says rats and mice can gnaw through plastic, wood, rubber and even concrete block. But their teeth have a hard time on a smooth, round surface wider than about 7/8 inch. Give them an edge and they get through most things. A cut feeding opening is an edge.
The bigger gap is the opening itself. The same guide says a rat needs only slightly more than a half inch to squeeze in. A 3-inch port is far wider. That tells me the lid or cap at night does the real work. Darren locks his feed in with a weighted lid. Karen brings her feeder inside. If rats already live near your coop, a treadle feeder is the better tool. Our feeder guide has the comparison.
Is PVC pipe safe around chicken feed?
I found no test of feed stored in a PVC feeder. So here is what the labels say, and then my read.
The pipe checks out. Home Depot’s pipe page lists it for potable (drinking) water. It says the pipe meets NSF Standard 61, the standard for parts that touch drinking water. Charlotte Pipe’s answer on that page says the same. NSF’s public list also carries Charlotte’s PVC pipe under that standard.
The fittings are less clear. Home Depot’s pages for the elbows, caps and wye I priced all say “non-potable water.” They are drain, waste and vent parts. Fernco’s answer on its cap’s page says the rubber cap isn’t suggested for drinking water.
None of that makes a PVC feeder dangerous. Dry feed isn’t drinking water. I’d worry about damp, moldy feed long before I’d worry about the plastic. If the fitting labels bother you, the bucket route skips most of them. Just use a food-safe bucket.
FAQ
Is a DIY no-waste feeder cheaper than buying one?
Not if it’s PVC pipe. A one-off tube is about $84 in parts and a trough about $110, while Omlet’s port feeders run $69 to $109. A bucket with a port kit is the exception, at about $24. Building three tubes from one stick brings each down to about $47.
Will rats chew through a PVC feeder?
They can. Extension guidance says rats gnaw through plastic, and a cut opening gives them an edge to start on. But a rat doesn’t need to chew. It can get in through the open port. Close the feeder at night.
Should I take the feed away at night?
For adult hens, yes, if rats are a worry. Anna says chickens won’t eat once the lights are off, so it costs them nothing. Chicks in a brooder with a light on do eat all night, so leave their feed out.
Why won't my hens use the feeder?
Fill the tube to the top first. That was Karen’s advice to a reader whose hens ignored her tube. Then check the opening size. One reader’s rooster couldn’t eat from a 3-inch tube because of his comb.
What's the cheapest feeder for chicks?
Karen Juarez’s chick version: a 3-pound plastic coffee container over a pan cut from the bottom of a 2-gallon bucket. Chicks eat small portions, so the feeder is the cheap part of a brooder. Get the temperature right first. Our brooder temperature guide goes week by week.
Here’s how I’d choose.
- One free Saturday and a small flock: a food-safe bucket and a port kit, about $24. Hang it, or set it on a stand and drill low.
- More hens, a neighbor to split the pipe with, and a wish to refill from outside the run: Darren’s trough. I’d look at 4-inch pipe first.
- Rats already near the coop: skip all of these and buy a treadle feeder. Our feeder guide has the payback math.
Whichever you pick, keep the feed dry. Mold came up more than any other problem in the comments I read.

Best No-Waste Chicken Feeders (2026): Treadle vs Port, With the Payback Math
No-waste chicken feeders compared on real refill intervals and waste savings, with the payback math for a treadle feeder that nobody else publishes.
10 Automatic Chicken Coop Door Problems You Should Avoid
Cold snaps, frozen tracks, bad light sensors, and missing manual buttons: ten automatic chicken coop door problems you can run into and how to avoid them.